It is so hard to get back to writing after a long break and I could not
decide where to pick. So I am sharing one of the easiest and simple DIY
which will not need lot of writing and formatting.
I had this kitchen tray on my counter-top to corral my oil containers. But over a period of time, it got messy due to oil drips despite me changing the liner regularly. I had to replace tray.
Three years ago we upgraded our bathroom floors from Linoleum to tiles. And Mr. had saved and store few tiles safely for those just-in-case-the-tile-in-the-bathroom-floor-cracked-and-we-will-not-find-a-replacement.
I had seen couple of bloggers who made tray from marble slabs and I had liked them. Since I already had these marble lookalike tiles, I picked one and went to work on it.
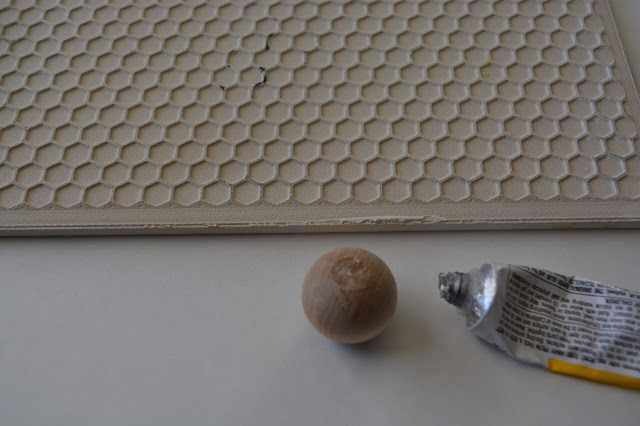
I used these:
I glued four of the wooden spheres to four corners of the tile.
Turn the tile right side up and place something heavy (books) on it so the glue sticks to the tile. Let the glue cure for 24hours.
Next day, I painted the now new wooden feet of the tray in white. Since it was unfinished wood, I applied 2-3 coats.
I made this tray sometime last year and I find it easier to clean. I wipe off the mess on the tile with regular dish washing liquid and sponge and rinse it under the tap.
The only concern I have is I might hit the tray against the faucet while washing. But I have been careful.
I spent less than $3 for this. I had the tile which cost us $1 each when we bought it years ago. I paid $2 for the wooden spheres and I have enough leftover for other projects and I had the glue.
I had this kitchen tray on my counter-top to corral my oil containers. But over a period of time, it got messy due to oil drips despite me changing the liner regularly. I had to replace tray.
Three years ago we upgraded our bathroom floors from Linoleum to tiles. And Mr. had saved and store few tiles safely for those just-in-case-the-tile-in-the-bathroom-floor-cracked-and-we-will-not-find-a-replacement.
I had seen couple of bloggers who made tray from marble slabs and I had liked them. Since I already had these marble lookalike tiles, I picked one and went to work on it.
I used these:
- 11x14" marble lookalike tile (you can choose the size/color of your choice)
- Wooden spheres (or beads) from Hobby Lobby, these come in a pack of 16 for $3.99. Use your coupon.
- Glue. I use E6000 for my projects but on this day I could not find it so ended using glue from dollar store which also works fine.

I glued four of the wooden spheres to four corners of the tile.
Turn the tile right side up and place something heavy (books) on it so the glue sticks to the tile. Let the glue cure for 24hours.
Next day, I painted the now new wooden feet of the tray in white. Since it was unfinished wood, I applied 2-3 coats.
I made this tray sometime last year and I find it easier to clean. I wipe off the mess on the tile with regular dish washing liquid and sponge and rinse it under the tap.
The only concern I have is I might hit the tray against the faucet while washing. But I have been careful.
I spent less than $3 for this. I had the tile which cost us $1 each when we bought it years ago. I paid $2 for the wooden spheres and I have enough leftover for other projects and I had the glue.
How did Mr. Tweaks react when he came to know that the tile was one of what he had safely stored away? I will just say, I had almost removed wooden spheres to hand over his precious tile to him. No. It did not happen.
Have a wonderful rest of the week.
Reshma


It looks really beautiful!!!
ReplyDeleteThank you Rachana.
DeleteSuch a simple idea. Looks stunningly classy. Very nice Reshma
ReplyDeleteThank you Aishwarya.
DeleteWow. That is a great idea. I love using stuff I already have and making it fabuous like you did! Thanks for posting. I found you on Hometalk.
ReplyDeleteThank you for dropping by, Moi.
DeleteSome online tile stores will send you a free sample tile if you just ask...no shipping fee either! YAY!
ReplyDeleteThat's great. Thanks for the information.
DeleteThe result is screaming Wow!!!! Hats off.
ReplyDelete